In this tutorial, I want to give you the quickest start with the Karate Test Framework.
There are already many getting started tutorials for Karate on the net, but if you want to develop e.g. a Karate scenario with VS Code in a Gradle-based project, you had to collect everything from a variety of sources. In this tutorial, you will find everything in one place.
You can find the code for this tutorial in my Karate getting started guide GitHub repository.
Check it out!
Do We Really Need API Testing?
I’m a software developer and a friend of unit testing. I can create unit tests quickly and execute them directly. I get quick feedback and I can check if everything works immediately. Why should I create an API Test when I already have Unit Tests in place covering the important parts of my program?
With Karate I can develop API tests in the same way as I write a unit test.
So it doesn’t make a big difference to me, if I write a unit test in Java or implement an API test with Karate, for
instance.
I get feedback almost as fast.
I develop the test just as quickly as a unit test and I can execute the Karate test in my known unit test environment.
It’s possible to use the same code base for your Integration Tests.
Even if I can’t reuse the entire codebase in a system integration test,
I definitely benefit from using the same programming language for both types of
tests.
This smooth transition from unit tests to API tests makes the Karate Test Automation Framework a valuable tool in my toolbox that I would not want to miss anymore.
Another aspect, I would like to mention here, is the good cooperation between software developers and testing engineers. With Karate you have a test automation tool at hand test engineers can use primarily and a software developer as well. This means you have a common communication language that enables you to store the shared understanding of your system executable. I believe this is a valuable aspect.
To be clear about that: I would not recommend using Karate as a unit testing replacement.
What is Karate Test Framework?
Karate is an external domain-specific language based on Gherkin language to create API, Web UI, and Desktop UI tests. It was first published by Peter Thomas in early 2017, and it gained traction pretty fast. It was first mentioned on Thoughtworks Technology Radar in April 2019 as a language/framework to assess. In May 2020 it moved up to trial. It counts currently about ~7.5k GitHub stars (12.2023). That’s quite an impressive career for a tool that’s round for about 4 years.
Peter Thomas is the driving force behind Karate. He founded Karate Labs in late 2021 and I’m very happy that Karate Labs is backed by Y Combinator.
When I asked him about his Why, he answered that he always has been interested in getting an open-source project to " click". He had many attempts and finally, it seems to have happened.
Creating software that matters for people who care is truly honourable.
Karate Test Framework Features
Karate has a really long feature list, and it grows day by day. Looking at the feature list is like Christmas. You’re excited about new things and you don’t know how many presents you will get. But you are pretty sure that you will have something to play with. Every time I look at the karate feature list, I discover new things I want to play with. Although you can look up the full Karate feature list by yourself, I want to share the most important Karate features:
- API, Web UI and desktop UI testing automation support and you can mix these in one integration flow - this is huge!
- Easy to write and read tests.
- Express expected results as readable
- Scripts are plain-text, require no compilation, fast execution, and teams can collaborate using Git / standard SCM
- JSON and XML: Karate has native support for these languages.
- Comprehensive assertion capabilities
- Fully featured debugger that can step backwards
- Scripts are reusable, you can call them by other scripts
- Built-in support for switching configuration across different environments (e.g. dev, QA, pre-prod)
- Built-in test-reports compatible with Cucumber so you have the option of using third-party (open-source) maven-plugins for even better-looking reports
- API mocks or test-doubles that even
- maintain CRUD ‘state’ across multiple calls - enabling TDD for micro-services and Consumer Driven Contracts
- Comprehensive support for different flavors of HTTP calls
Tools for Working with Karate
You need to install a few tools before you can start using karate. If you have already a working Java environment, just skip this section.
Java
Karate Test Automation Framework is running on top of Java, and therefore you need to install a JDK. I suggest you use SDKMAN! to manage all your JDKs. It works pretty easy on Linux and Mac boxes and you can use Windows Subsystem or Git Bash to run it on Windows.
Maven or Gradle
It’s possible to run Karate just from the command line, but if you want to automate Karate test case execution, I would suggest that you use Maven or Gradle. Therefore, I’m going to show you how to use Karate in a Maven or Gradle project.
IDE
I’m glad that these days where you have to code in a normal text editor over.
Tool support for a language is king and most DSLs lack good tool support and having that was one of Peter Thomas'
motivations to use Cucumber as a foundation for Karate.
You get basic Cucumber support for every IDE. I’m not aware of an IDE that doesn’t provide a Cucumber plugin.
But, if you choose VS Code as your IDE, you can benefit from the dedicated Karate VS Code plugin.
Debugging and Syntax Highlighting are the key features of that plugin, and if you have worked with it once, you don’t
want to use another IDE for that job.
Therefore, I highly recommend using VS Code for Karate test case development.
However, in this tutorial I will show you how to run Karate test cases with IntelliJ IDEA as well, because it’s one of the most used IDEs out there and it’s my favorite when I work with Java, Kotlin, Phyton, and so on.
I use IntelliJ IDEA to work on Java codebases and VS Code to develop Karate test cases to get the best of both tools.
Update: A Karate Plugin has been released by Karate Labs Inc I did not test it yet.
Setup a Maven Karate Project
I prefer to use the command-line over the IDE to set up new projects because I like the flexibility.
I don’t rely on having an IDE to start a project and I can import that newly created project in whatever IDE I want to
use.
My command history is like a command knowledge base, and I can search for executed commands.
Therefore, instead of showing you how to set up a project using IntelliJ IDEA or VS Code, I will show you how to create a project using the command line and how to import that project into the IDE.
As mentioned before, Karate runs on Java and integrates seamlessly with Maven or Gradle. Thanks to the Karate maven archetype, starting a new project with maven is as simple as executing the following command:
| |
After you have run the command successfully, Maven generated the following file tree:
| |
The next section explains the purpose of each file.
Structure of a Karate Project
Karate Configuration - karate.config.js
The karate-config.js is a simple way of configuring karate. It should exist on the classpath, contains a JavaScript function, and should return a JSON object where its keys and values are available in every Karate test. The most common way of using this file is to provide configuration for different environments and to share global identifiers.
I don’t want to elaborate on the possibilities of this configuration file. That’s a topic for another post, but If you want to define something globally that is available in every Karate test, this is the place to put it.
Karate JUnit Runners
The ExamplesTest.java is a JUnit test that runs every Karate test.
This test class bridges the java JUnit test execution with the Karate test execution world.
| |
The UsersRunner.java is a JUnit test, but Maven won’t execute it during the test phase because it only respects
classes ending on Test by default.
This class empowers you to execute the users.feature file as a JUnit test if you aren’t capable to run
the users.feature from your IDE.
| |
Structure of a Karate Test - users.feature
The users.feature example uses the jsonplaceholder API, and you can execute it without the need to start another
application on your local machine. This makes it easy to get started and to experiment with the example without the
hassle to start another application with its dependencies.
Ok, so let’s check out the example:
| |
This test fetches a list of users, stores the first user in a variable called first and uses its ID to fetch the full
record.
First, we will look at the gherkin keywords, and then I will explain the Karate keywords.
Gherkin Keywords
The keyword Feature: defines a high-level description and groups the scenarios.
Background: is used to define a code block that Karate executes every time before it runs a Scenario. This is analog
to the setUp method of unit test.
The Scenario keywords define the test case itself like your test methods in java and each feature file may contain one
or more Scenarios.
Gherkin defines the following keywords that define the start of a statement.
GivenWhenThenButAnd*
You can use these keywords to make your test more readable, but these keywords don’t affect how Karate executes the Scenario. They are completely interchangeable and you can use whatever you want. You just have to use one of these keywords to start a step definition, because it’s defined in the Gherkin syntax that way.
However, I would suggest using these keywords in a reasonable order, because having “Given, When, Then” in the right
order creates a much better reading experience than a wrong order or just *.
Karate Keywords
These keywords are Karate keywords:
url: Defines the base URL that Karate uses for the next web request.path: Specifies additional path fragments. The framework adds these fragments to your URL.def: Marks the start of a variable declaration.method: Sets the HTTP method that Karate uses to make request, and it marks point where Karate executes the web request.status: Represent a HTTP response code assertion. If the returned response code doesn’t match the specified one, Karate will mark this test as failed.
It’s very hard to come up with something that is even simpler than that, and that’s one of the important aspects of Karate. The code is really easy to read, and every junior should get an idea of what’s going on when reading this. I can’t emphasize enough this aspect of Karate.
Before I show you how to run the example, I want to present you how to make an existing Maven or Gradle project Karate ready and I like to mention a thing that might you find disturbing already if you are a long time Maven user.
Resources Files in Source Folder?
You might have already noticed that the default is to place the karate-config.js and users.feature
in src/test/java folder and not in a resource folder. In the Maven world, you should only put .java files in the
src/test/java folder, and not doing so is a “bad” decision, because src/test/resource is the place where you put no java
artifacts, right?
There are two arguments to place .feature in the src/test/java folder. First, you reduce the folder navigation
distance if you keep feature files near their java test runners. We, as humans, like it if things belonging to the same
category have the same place.
Second, Karate test files contain executable code and aren’t simple resource files. The same argument is valid
the karate-config.js file.
However, creating a new src/test/karate folder and making this a source folder like it’s done for other JVM-based
languages would be another consistent approach.
The motivation behind this decision was to keep things simple, and if you don’t like it, you are free to change it.
Making Projects Karate Ready
You already know how to set up a new Maven Karate project, and I explained the Karate project structure before showing you how to work with existing Maven projects or how Gradle and Karate work together.
This section is about making your existing Maven project Karate ready and how to make Karate work with Gradle.
Maven Project
If you have already a maven project and want to make that Karate ready, you only need to add the following dependencies
to your project pom.xml:
| |
If you want to place the .feature files into the src/test/java folder like it’s done in the example, add
this testResources configuration:
| |
Starting a Gradle Karate Project
Gradle has no widely accepted counterpart of Maven archetypes, and there is currently no direct way to set up a ready-to-go Gradle-based Karate project. But Gradle provides a feature to create a Gradle project from an existing maven project. It doesn’t make a good job if you have a complicated pom.xml file with different custom plugins, code generations, and so on, but it works pretty well for simple projects.
Create a Karate example project with the Maven using the archetype from the previous section and then run the following Gradle command to turn your Maven project into a Gradle project:
| |
This will create all needed Gradle files, but unfortunately, you have to make a few adjustments to the build.gradle:
Use this snippet if you prefer using Kotlin DSL:
| |
Existing Gradle Project
If you have already a Gradle project and want to make that karate ready, you need to add the snippets from the previous section and the following dependencies to your project:
| |
Running Karate Features
You can find more information on the Gherkin reference page.
In order for the Karate features to run during the test phase of the build process, you need a JUnit test case that
serves as a runner for the Karate features
Executing Directly in Your IDE
You can execute Cucumber Scenarios directly in almost every IDE using the proper cucumber plugin. Therefore, you need the Gherkin / Cucumber plugin to run the Karate test directly within the IDE.
I’m going to show you how to install the plugins and how to run a Karat test in IntelliJ IDEA and VS Code.
IntelliJ IDEA
Follow the instructions from the IntelliJ Idea website on how to open a maven project with IntelliJ IDEA.
If you are running the IntelliJ IDEA community edition, install the Gherkin plugin first before you can run Karate test cases.
Press Ctrl+Alt+s or got to File->Settings to open the settings dialog, select Plugins on the left side,
and search for Gherkin:
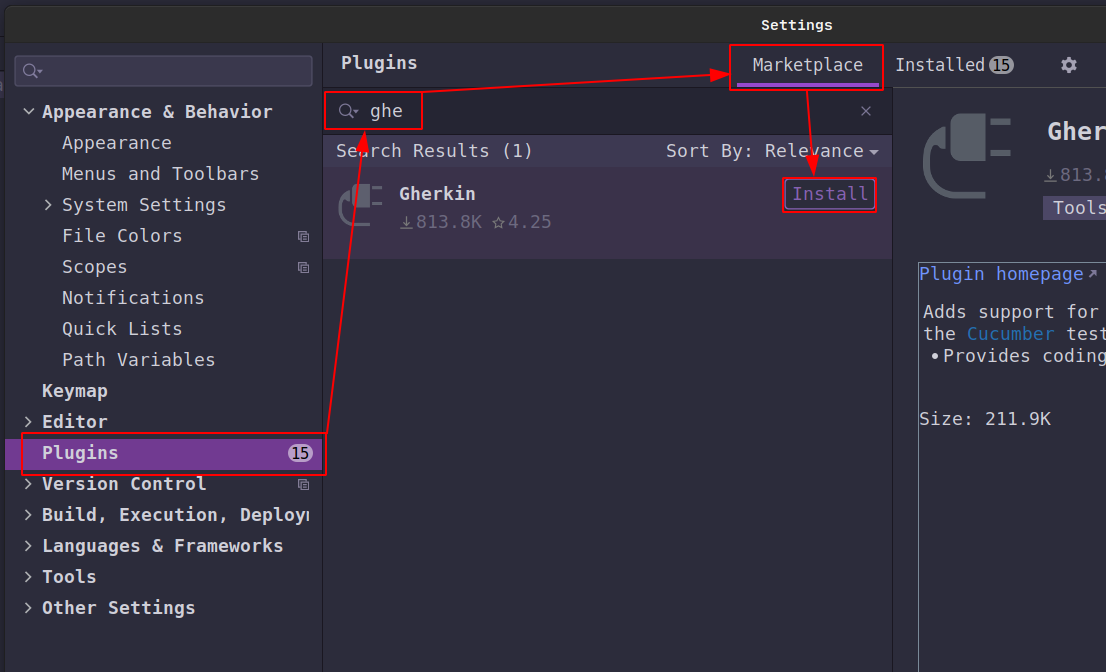
The Gherkin plugin will give you syntax highlighting support,
but you won’t be able to execute the Karate scenario directly.
It brings this feature to you via the Cucumber for Java a plugin that you need to install the same way:
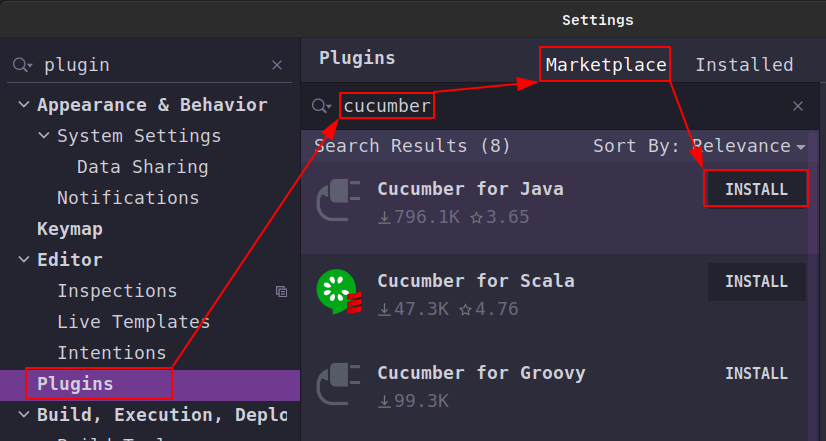
If you are using IntelliJ IDEA Ultimate Edition, you don’t need to install them, because they are part of the Ultimate Edition package. You only have to enable these two plugins, that’s all.
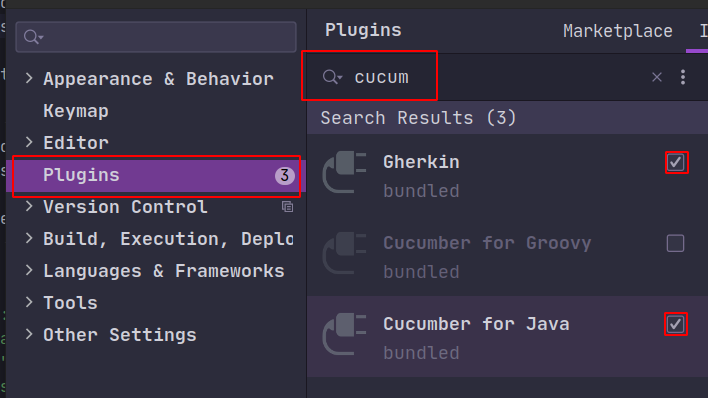
After installing/enabling both plugins and restarting your IDE,
see the exaction gutter icons on the left side when you open a .feature file:
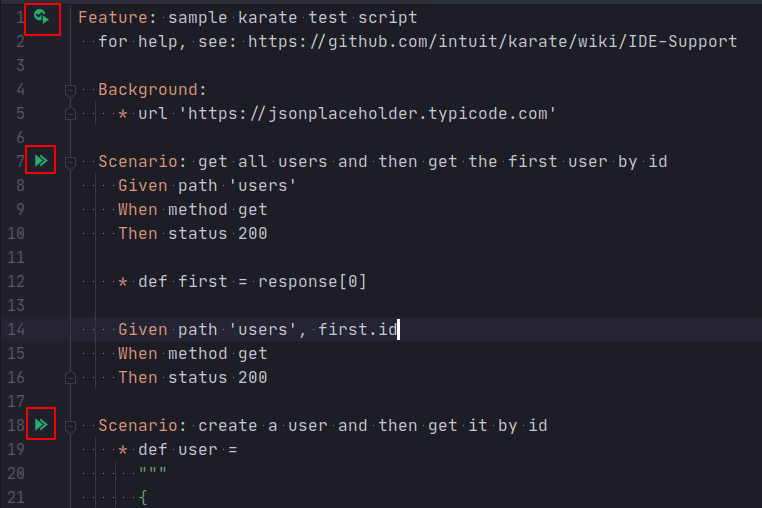
Clicking on a gutter icon will open a list of possible executions, but only the first Run ‘XY’ where XY is the name of the feature or scenario you want to execute makes sense.
Debugging with IntelliJ IDEA doesn’t work, because Karate steps work differently compared to cucumber steps.
Update - Don’t Install Cucumber + Plugin
Karate Scenarios doesn’t run if you install:

Don’t do that!
IntelliJ IDEA Karate Plugin
Unfortunately, there is no dedicated IntelliJ IDEA Karate plugin that provides proper syntax checking, highlighting, autocomplete, and debugging.
Karate VS Code Plugin
VS Code is a great platform that offers a plugin for every purpose. So, it isn’t surprising if there is a plugin for karate and that plugin-in provides direct execution and debugging of Karate tests via code lenses, syntax highlighting, and dedicate Karate view. That view offers a Karate feature outline and a direct link to the latest execution report.
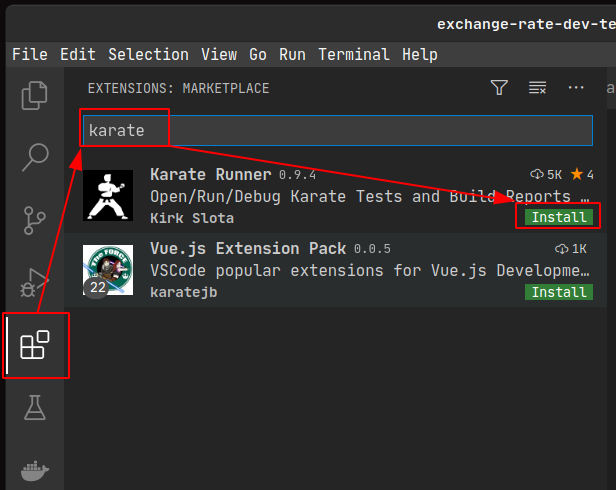
If you haven’t already installed the Karate VS Code plugin-in, go to the extension view, search for karate, and click on install.
Restart VS Code after you have installed the plugin.
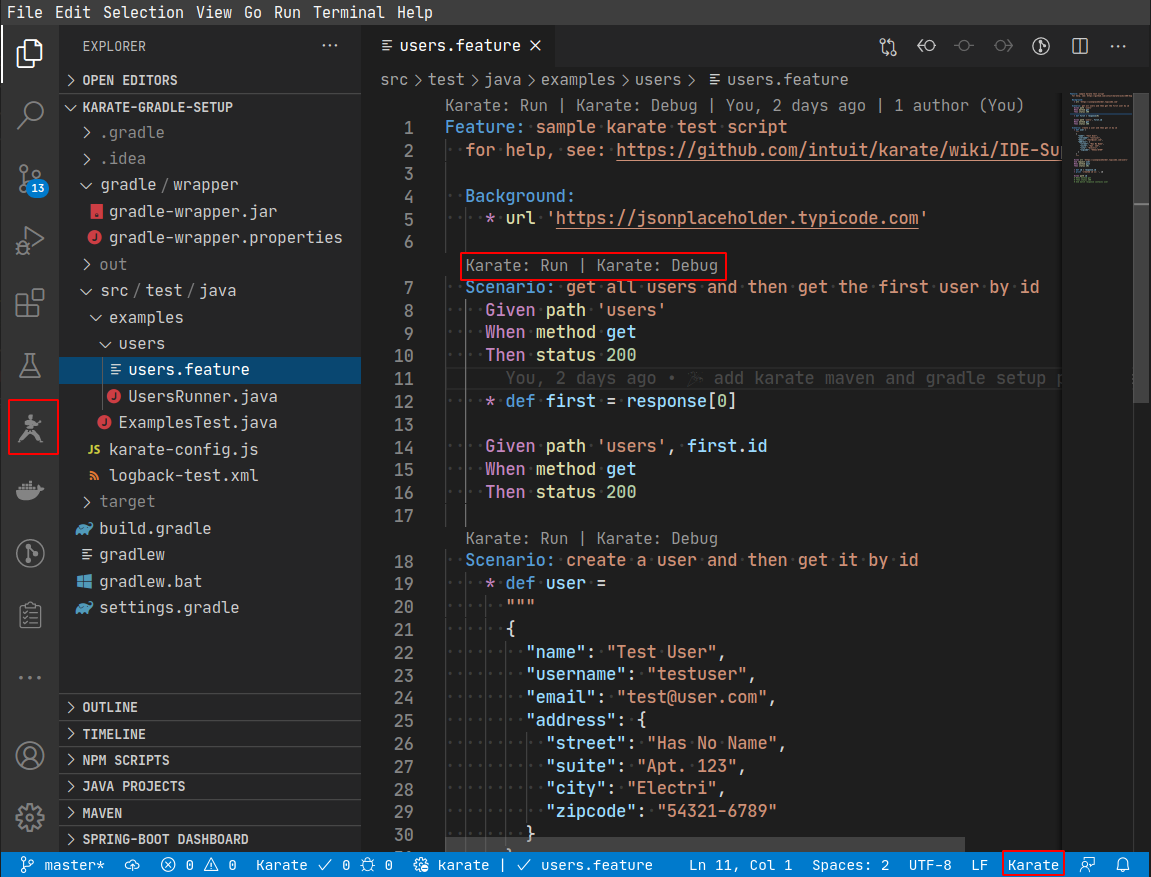
Open a feature file after you have installed the plug-in. You should see the Karate: Run | Karate: Debug code lense on
top of the feature and every scenario. Syntax highlighting should work right away and if you don’t see something
similar like in the following screenshot, make sure you have selected karate as your language.
You can see the currently used language in the bottom right corner of your VS Code window.
How to Change to Karate Language Mode
VS Code is a platform that supports a variety of languages, and every VS Code associates every language to filename
suffix. VS Code uses that suffix to choose the default language when opening a file. Since Gherkin and Karate use the
.feature suffix, there is a pretty good chance that you have installed two plugin-ins that VS Code associates with the
same language. Needless to say, you will find more languages associated to .feature file suffix in the VS Code
marketplace.
So, if you don’t see a code lens on top of a feature or scenario, it’s likely that you don’t use karate as your current language. To change the language, click on the currently used language (it’s featured in the screenshot below), search for karate, and select Karate as your language.
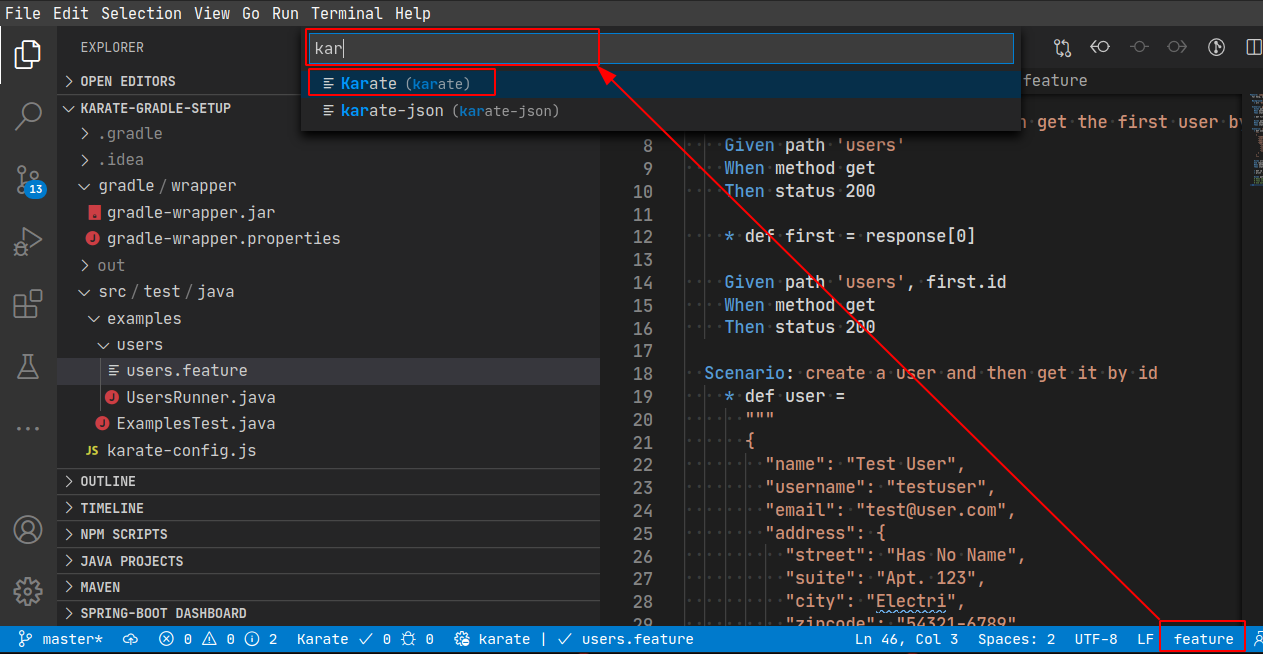
In the screenshot above, you see the karate-json language. You should ignore that language. I introduced that language
with the motivation to separate karate-json from the “core” language because karate-json is JSON on steroids.
We installed the karate VS Code plugin and we have selected the proper language. Let’s execute a Karate scenario!
Prepare for VS Code Karate Execution
The VS Code Karate plug-in supports three execution options:
- Standalone: The plugin finds the Karate standalone executable (
karate.jar) in root project folder. - Maven: It finds a
pom.xmlin root project folder. - Gradle: Or it finds a
build.gradleorbuild.gradle.ktsin the root folder
The plugin checks for each of these modes with the priority listed above. If you have a maven project and place
a karate.jar in the root folder, for instance, the plugin uses the standalone execution option.
I use the standalone mode for projects where I just collect different API requests that I use on a regular basis. With
the standalone mode, I can execute a request faster compared to running with Maven or Gradle, and I don’t need to have a
full working Java project.
You can download the latest karate standalone jar from the bintray or GitHub release page.
If you have a maven project or you are going for the standalone approach and you have already placed an karate.jar in
the root folder, you are ready to go.
Gradle Needs an Extra Task
If you have a Gradle project and you tried to execute a Karate scenario already, you might have noticed this error message:
| |
The VS Code Karate plugin relies on a karateExecute task to be present, as noted
in VS Code Karate plugin documentation.
Just add the following Gradle task definition to your build.gradle file and you are ready to go:
| |
Same task for Kotlin DSL:
| |
After you have added the task to your Gradle build file, you are ready to run Karate scenarios.
Different Ways to Execute Karate Scenarios
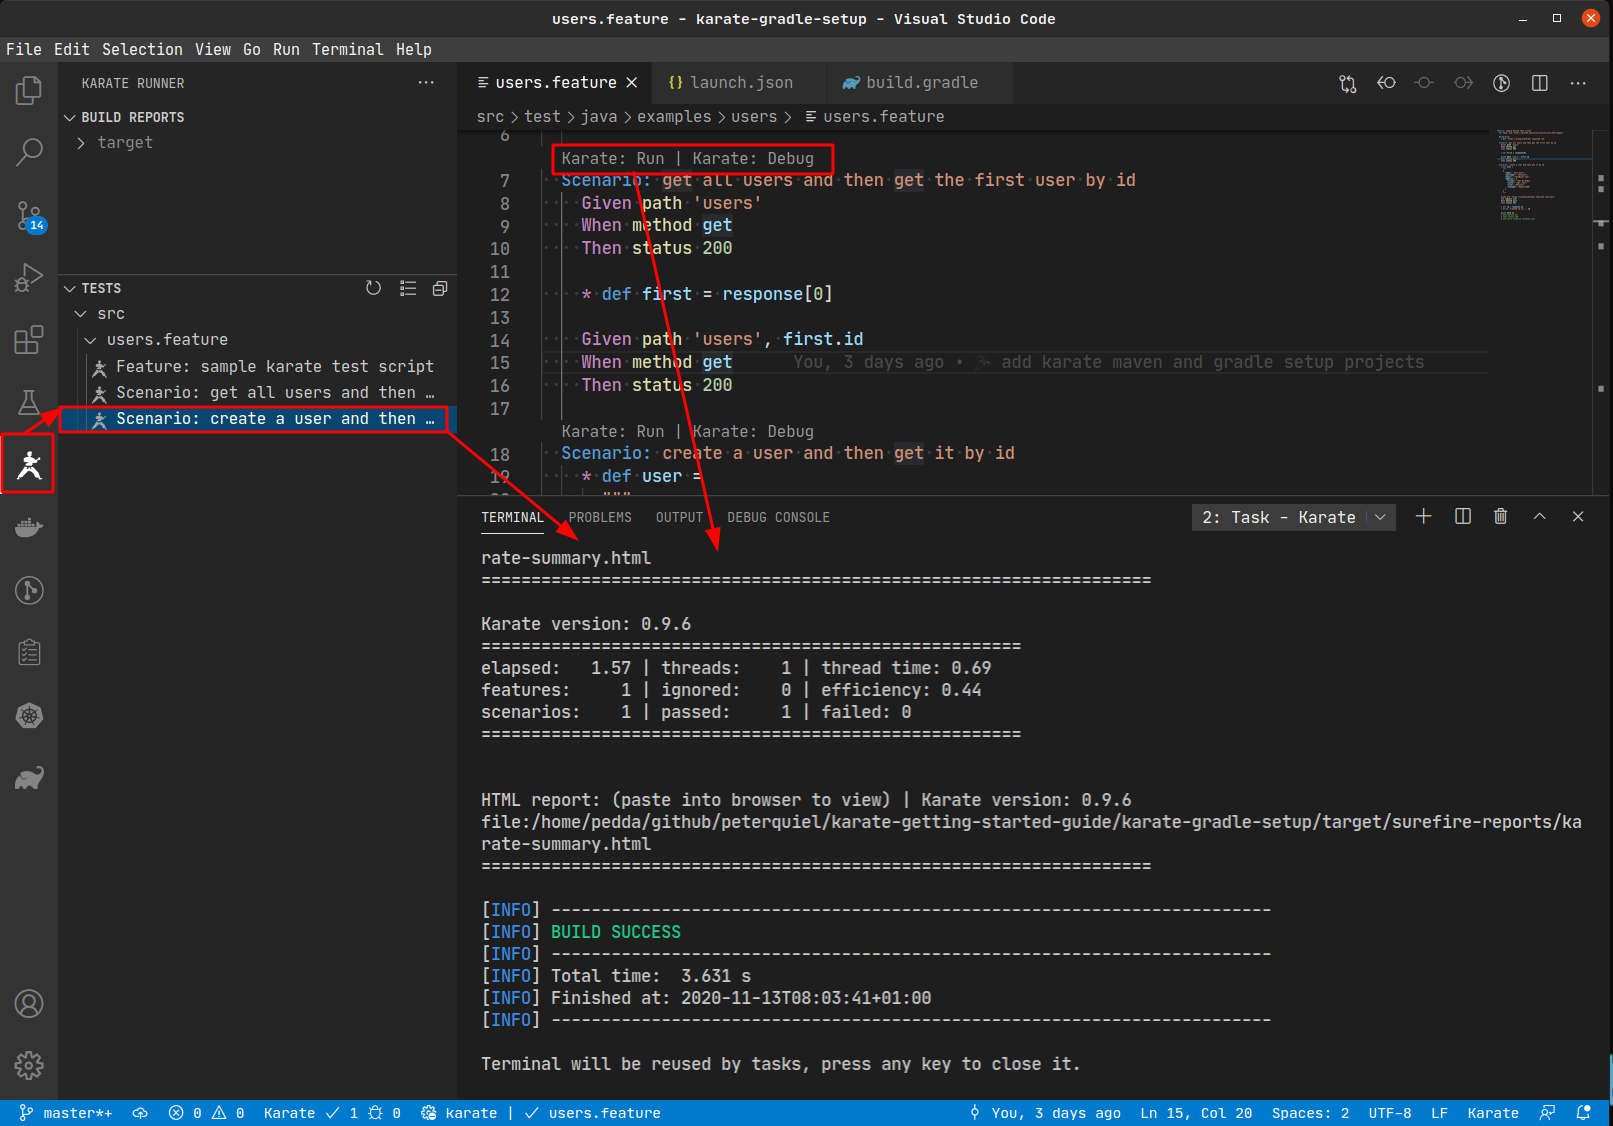
The plugin offers two ways of executing a Karate Scenario via VS Code. You can just click on the Karate: Run code
lense or you use the test overview in the Karate sidebar to execute a test.
You can configure shortcuts to execute the scenario you are currently in. They list the default key binding on the VS Code Karate plugin page. If you want to check for yourself or change the shortcuts, just press Ctrl+K or Ctrl+S for Windows, Linux, and ⌘K ⌘S for Mac and search for Karate:

As you can see, I already reconfigured the Run Karate Test key binding.
Debugging Karate Scenarios with VS Code
The plugin supports debugging. You can place a breakpoint in your Karate scenarios and then step through your karate
code. Before you can debug, you need to create a run configuration for that purpose.
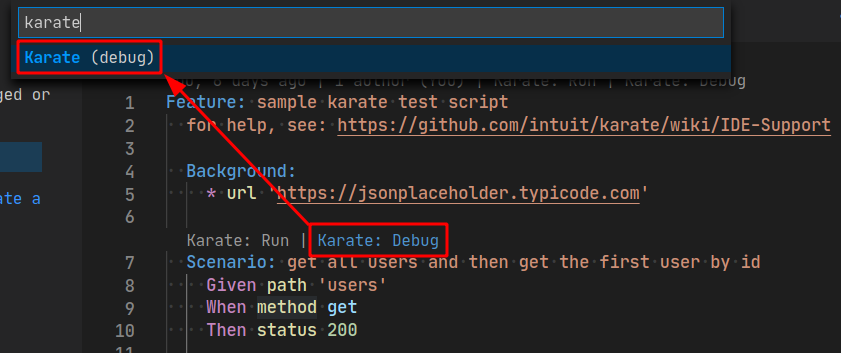
To do so, click on Karate: Debug Codelens, type karate in the search input field and select Karate (debug) as you can
see in this screenshot:
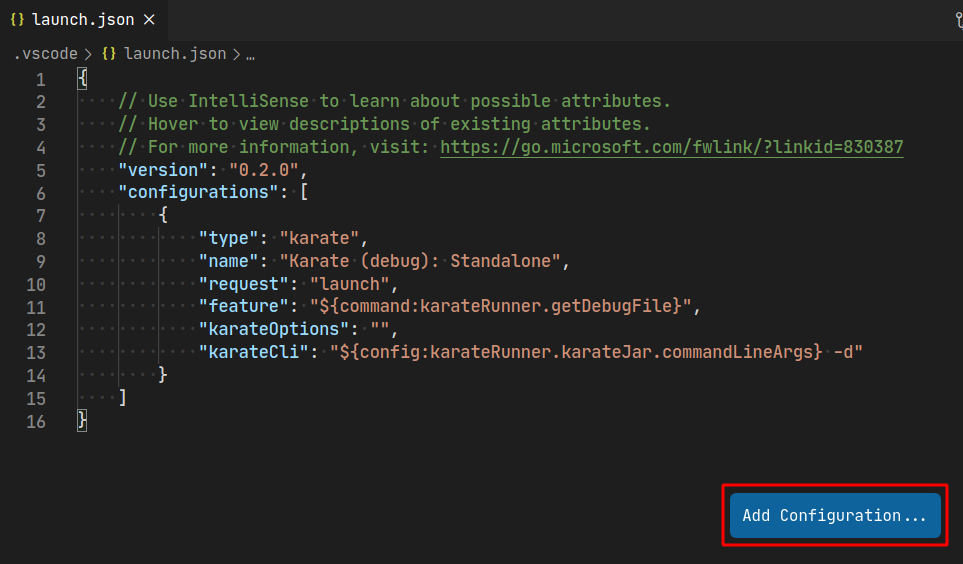
After you have selected Karate (debug), the plugin automatically creates a new launch configuration with a working
entry for the Karate standalone execution mode. If you are using the Karate standalone mode, that’s all you need to
do. If you are running a Maven or Gradle project, create a dedicated launch configuration. Just click on the
blue Add Configuration button in the lower right corner.
This will place the cursor to the correct position and open autocomplete for you. Type karate and you will see two
options. One for Maven and the other for Gradle.
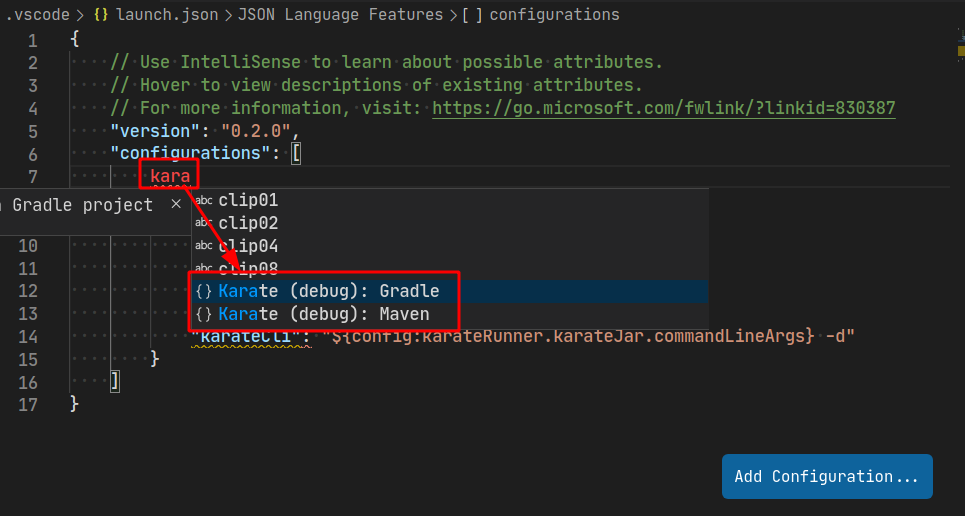
Choose the right configuration for you. This will insert the needed launch configuration, and you don’t need to do further adjustments.
Debugging
Place a breakpoint at an interesting location. Right after request execution, for instance, and debug the Scenario by
clicking on Karate: Debug code lens.
The following screenshot shows the state right after the execution stopped at the breakpoint:
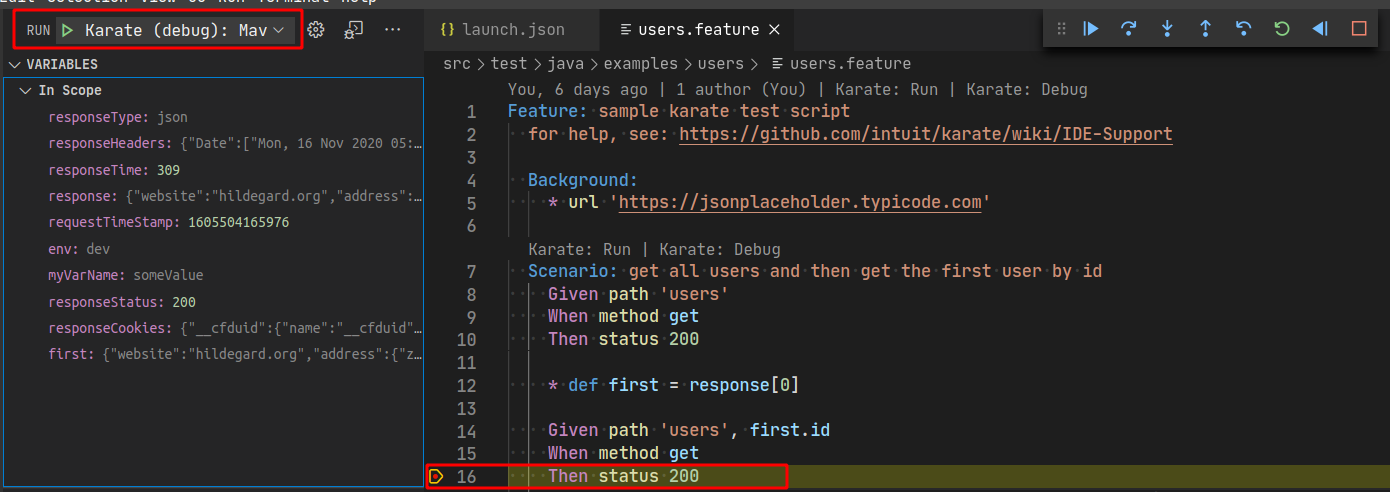
The left activity bar shows all values, and this can be very helpful for two reasons.
First, you can verify if you have the correct expectations, and second, you can investigate the state and check for
additional variables you need.
We declare the env variable in the karate-config.js, for instance, and that variable can change between
different testing stages. You could check the current value with a simple print statement, but setting a breakpoint and
starting a debug session is faster and easier than spotting a particular print message in the noise of standard outs.
Before I close this tutorial, I want to give you an overview of the Karate reporting feature.
Reporting
Test reporting is important when you want to know what went wrong during a continuous integration build. This is even more true if you deal with integration tests because they are flaky and you will often get false positives: tests that fail even though the application is behaving correctly. You may reduce the rate of false positives by making your test cases more robust, but you won’t be able to avoid them completely. Some statistics say that 3/4 of failed integration test cases are false positive. I don’t want to go into detail here, but it should be quite clear that the first thing you do when a test fails is inspected your reports.
I would argue that integration test reports are more important than unit test reports because a failed unit test should
be reproducible on your local machine and the false positive rate of unit tests is quite low.
This should be motivation enough to investigate Karate reports.
Example Karate Report
When you execute the get-all user’s Karate test case, you will see the Karate execution report in your terminal. Karate
uses log back as its logging backend and you can find the output in the log back-test.xml file. The stdout report
gives you fast feedback and you see immediately if everything works or if some test cases failed.
Karate generates an HTML report that provides a more visual overview of the executed Features & Scenarios and that helps you in case your CI pipeline failed to track down the cause. The last message on the standard printed by karate is a quick link to that report:
| |
Pasting that link in browser results in the following execution overview:

The detailed page lists all scenarios, their step definitions, and their execution time. This helps to spot long runners immediately. Karate offers a bunch of configuration options, and one option is to configure the verbosity of a report. I
used this configuration placed in the Background block to create the following report:
| |
The showLog:true integrates the log output of a step definition into the report. The red arrows point to the step that
has some output associated with it. If you click on the blue 4, you will see the complete request and its
corresponding response. Tracking down test failures with that level of detail is really simple.
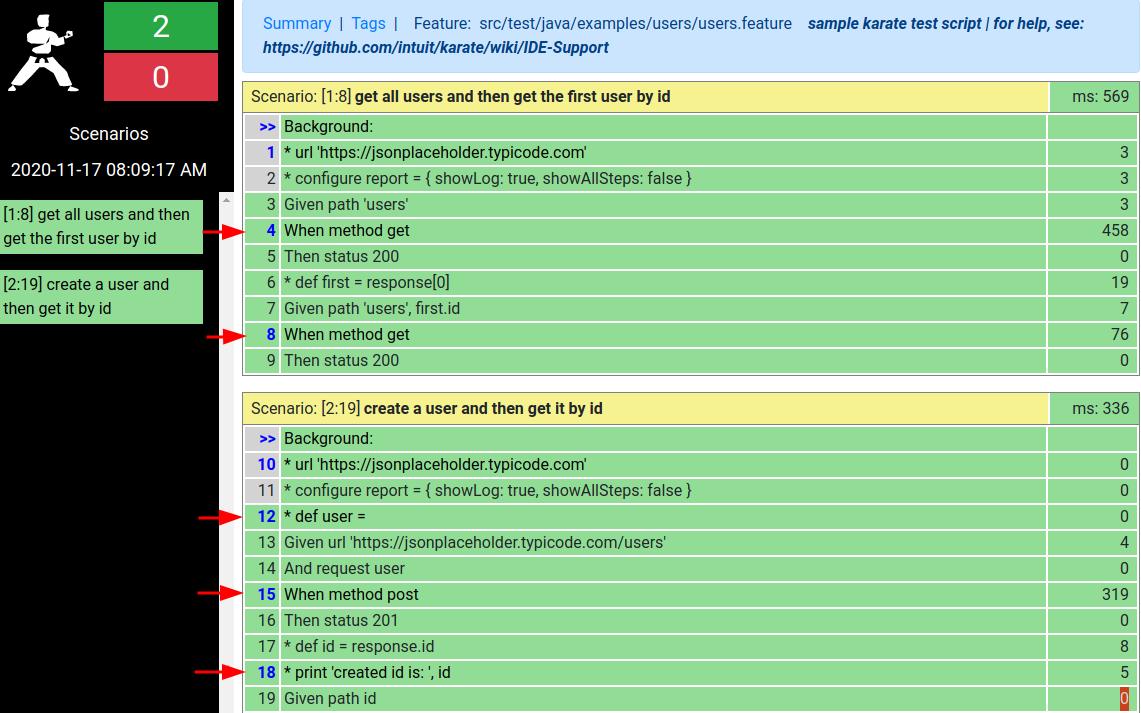
I have to admit, that this report is not the best looking one, but the information it provides is compensates everything and we are not here to win a beauty contest. This should give you a clear picture of how the Karate Test Automation Framework would improve your integration pipeline.
Conclusion
I showed you how to integrate karate into Gradle and Maven projects, and I showed you how to run karate projects from different IDS. I explained the features of the VS Code Plugin, and I also gave you a brief explanation of how to build a Karate test file. Finally, I showed you the detailed Karate reports.
An important feature that I will cover in a future blog post is Web UI Testing with Karate and how it seamlessly integrates with API tests. I use it to combine UI and API tests in one Scenario, verifying that changes in the frontend have the right effect on the backend.
Thought Works Technologie Radar classified Karate as a Test Automation Framework you should give a trial in 2019 and I totally agree.
